Tuesday, February 2, 2016

Forward Cabin and Sail Locker

Finally catching up in the forward cabin. The first order of business was the hull ceiling on the port side and then to trim out the sitz tub and put in the lid for the storage bin. This is all bare teak which looks nice with the varnished Douglas Fir and Cedar sitz tub.


The sail locker doors are slat doors for air circulation. Debating whether to make the same kind for the linen and clothes lockers on the starboard side or stay with solid panels like the rest of the boat. Slats would make more sense.


The Sitz tub trimmed out with bare teak.


 A nice little 3/4" brass drain from Toplicht with a small brass spring strainer.


Here is the drain for the sitz tub. Just an inline valve which also serves instead of a drain stopper and drain into a bucket and chuck it. Simple as can be. The hull is open behind the sitz tub so should there be any moisture it can run freely down the hull and into the bilge.


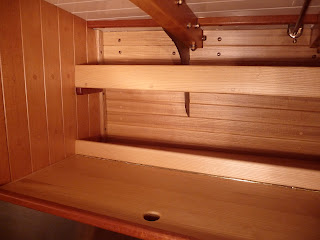
The storage bin forward of the sitz tub holds the high tech pump sprayer for washing and various tool boxes and supplies for rigging etc. The hull is lined with yellow cedar in the bin instead of ash and the shelves are red cedar with bare teak fiddles.


Looking through the sail locker doors. Could not remember if I posted this work before but the sail locker has been done for a while.  Note the massive purple heart samson post and blocking for gammon iron and backing for bob-stay fitting. These last two were fit as close as possible to the irregular fiberglass surface and then set into thickened epoxy so there would be no gaps. The hull ceiling in the sail locker is yellow cedar.


 Purple heart bob stay backing block....ought to hold.


Here are the chain bins. They are plywood glassed over with 6oz cloth and epoxy and trimmed with black walnut. They continue under the bulkhead so are quite big. It is a straight drop from the windlass above and the bins are not draining with the reasoning that I did not a whole lot of muck and stink draining back to the mast step. It will be contained here and I will try to keep it clean somehow.


Right now working on the yellow cedar hull ceiling in the starboard side of the forward cabin which is a hanging locker 2ft 3in and two good sized clothes and linen lockers. This is the last major section of interior woodworking to be completed and then a multitude of smaller jobs and details. 

Salon

The first thing to catch up on with the salon was the hull ceiling. A boring job but satisfying when done. I could not install the chain plates until that was in place. This was the process:

1. Fit chain plates to hull and drill for 1/2" carriage bolts
2. Fit ribs to hull for hull ceiling. These ribs are attached with 3M fast cure and then filleted with thickened epoxy.
3. Insulate
4. Fit hull ceiling
5. Now back drill through hull and through hull ceiling to give location for bolts
6. Take a hole saw with a dowel adapter to 1/2" and drill a 2 1/4" hole through hull ceiling
7. Make and fit teak spacers so with the addition of the bronze backing plate the whole thing would be a bit below the surface of the hull ceiling
8. Install chain plates.
9. Have a beer


The Starboard settee and book shelves. There is a shelf in the locker and the shelves are spaced to take a binder or large book at the bottom and a normal hardcover on the top


You can see the tubular webbing pull loops attached with a screw and finish washer to the back side of each settee seat for easy lifting.


 Book shelf cabinet open and closed. Yellow cedar slat shelf inside. 


The ends of the book shelf cabinet are mahogany slats and the shelves are yellow cedar slats. These slat shelves are made with cross bars that are fit into dados in the slats and the slates are in turn glued and screwed (and plugged) to the cross bars. I bit of time to make compared to a piece of plywood but the air circulation should be much improved. Looks nicer too! Here you can see the chain plate bolts through the ash hull ceiling. I did not want to cover them but like to see such structural  things as part of the aesthetic. Here if they start to go green you know it is time to re-bed the chain plates rather than down the road.


Port settee and pilot berth. 


Fwd end of pilot berth and chain plates. I like to see all the structural parts in view.  Here you can see chain plate bolts, tie rod, deck beam knee and backing block for stanchion. The slats for the berth are yellow cedar with spacers between them. Can also see how I dealt with the fiberglass flange. I painted it white and fit pesky little mahogany trim pieces between each deck beam to cover the offending flange. Fussy with all the compound angles but worth it.

The last woodworking job left for the salon is the table but before that can be done I need to install the mast step and water tank above the ballast. Then the two brass posts can be installed and the Pardy style table put in.

Thinking

Hardware

A hardware update. A few things have found there way onto the boat and it is always a satisfying feeling bolting on hardware. Things start looking instantly more finished once you bolt on some shiny bronze stuff.

  A nice pile of bronze

 
Here the boom gallows braces have been installed as well as the stern anchor hawse.


Finally all the chain plates are on the boat. This was a big job from pattern making to polishing and drilling and filing the holes square for carriage bolts, fitting to the hull, drilling the bronze backing plates, cutting the bolts to length and finally installing. I counter sunk the holes in the hull a bit so there would be some extra goop around the bolt. The bolts were hardened up the next morning so the bedding compound was not all squeezed out when installing.


The port lights was another multi-step big job now done. Cutting the bolts to length so there would be a nice round protrusion and installing. Hardened up the machine screws the next morning so all the goop would not be squeezed out when installing. Also filed a bevel to the last 1/4" of the opening so there would be a nice gasket of goop around the port light spigot.


Midship cleat tucked outboard a bit to hopefully not a toe stubber

Galley Update

So here we are well into 2016 and 11 years since I started working on the boat. It is hard to believe how the time goes on but when I look about the boat I also find it hard to believe I have built what is there. It just seems like such a massive project and any one little spot on the boat is a study of a ton of work. But everywhere I look I am also pleased with the results so there is a lot of satisfaction.

Major head and chest cold right now so using the down time to update the blog as it has been a couple of months. I usually try to update once a month as work does take time on boats and that usually gives me something substantial to post.

Here is the galley pretty much done. Some little details and of course there is hooking up the plumbing and stove etc but right now I am just concentrating on the woodwork.


The ash flip up counter the bridges between the ice box and galley adds considerable counter space and allows someone to work on the fwd side while someone can work at the galley side.


Here can be seen the ash  knife block behind the stainless flip up lid. The knife block is removable so it is easy to make a new one if necessary. The stainless lid gives quick access to the shelf below rather than having to reach all the way through the lower door opening


Bronze rod retainer pin for ash flip up counter.


Behind the stove is an ash flip up lid for a deep bin that can hold pots etc. There is also a place behind for storage and a shelf as well. It took me some time to decide how to build the outboard area of the galley but am pleased with the sliding door cabinet and this area behind the stove. Lots of practical storage.