Saturday, September 16, 2017

Spars Part III The Mast

The main job to do this summer was to get the mast built which we did in the last two weeks of August and into early September. I had acquired the Sitka Spruce spar wood over ten years ago through Eden Saw Woods in Port Townsend. It came from Haida Gwaii and the lengths were between 30 and 40 plus feet. It was beautiful wood, clear and tight grained. I felt it had to be honoured.

The first job was to plane it to thickness before transporting to Abernethy and Gaudin Boat Builders in Brentwood Bay here on the Saanich Peninsula. I decided in order to keep within my time frame and due to the scale of the job and length of the wood I would need a hand to get this last big job done on the boat. When I approached Jean Gaudin about working with him to build it he was just putting the final touched on a box section spar about 47ft long. 

Abernethy and Gaudin Boat Builders work mainly with traditional boatwork in a real old time boat shop in Brentwood bay equipped with a marine railway. This summer they just finished a total rebuild of the English Pilot cutter Carlotta.

http://www.agboats.com/

This turned out to be a great way to get the job done. It was great to work with Jean and his experience meant the job went efficiently and accurately. 

It would be a hollow round mast built of four staves like a box. The aft  and forward stave would be full width. The spar is 53ft 2in long and 7 1/4" diameter.


Planning the mast wood before transporting it up to A&G. I had the space to pass the 40ft lengths through the planer


The first job was to lay out the boards and decide what boards would be used where. We just managed to get all four sides with only one scarf per side. Not bad for a 53ft spar ! Next we built and leveled up a spar bench. 

Once the scarfs were cut with a circular saw, hand planed and glued we could cut the staves to width. Then we could layout for hollowing. Jean had a great technique using the circular saw and a small blade where he made passes at an angle to hollow. Just like you do on a table saw but here your passing the saw over the wood not the other way around.  All we had to do was clean up with the hollowing plane and make the transitions with a gouge.


We built the mast with the aft stave down as that would be straight, the sides and fwd stave would be tapered. The aft stave basically became the spar bench once glued up.


Jean using the circular saw to cut the hollows. This saved a lot of time and work. Been hot and sunny but really nice to work outside.


The hollowing transitioned to square where the red cedar blocking goes at the spreaders. Here the sides are dry clamped to the aft stave for fitting blocking and checking the fit. The side staves were cut with the circular saw, one edge was trued up with a jointer plane and then we planed it to final width through the Makita portable planer taking multiple passes. We ended up with fair edges that only needed minor adjustments to get a perfect fit for gluing.


Gluing the two side staves to the aft stave. We used 115 clamps. We left the aft stave full width and sprung in the side staves to our marks for the taper. Once the glue had cured we trimmed off the excess of the aft stave sticking out. 


Now we tapered and faired the side staves above the upper spreaders, added the conduit, ran wired for lights and tin foil for radar reflector. A test fit of the fwd stave and we were ready for sealing and gluing.


Glued up and square. It looks very heavy right now. The gluing went very well, nice glue joints everywhere. We used System Three G2 Epoxy.


Eight sided and starting to get lighter and look more like a mast. This is fun work.


Sixteen sided above the deck.


Knocking the corners off the 16 sides to 32


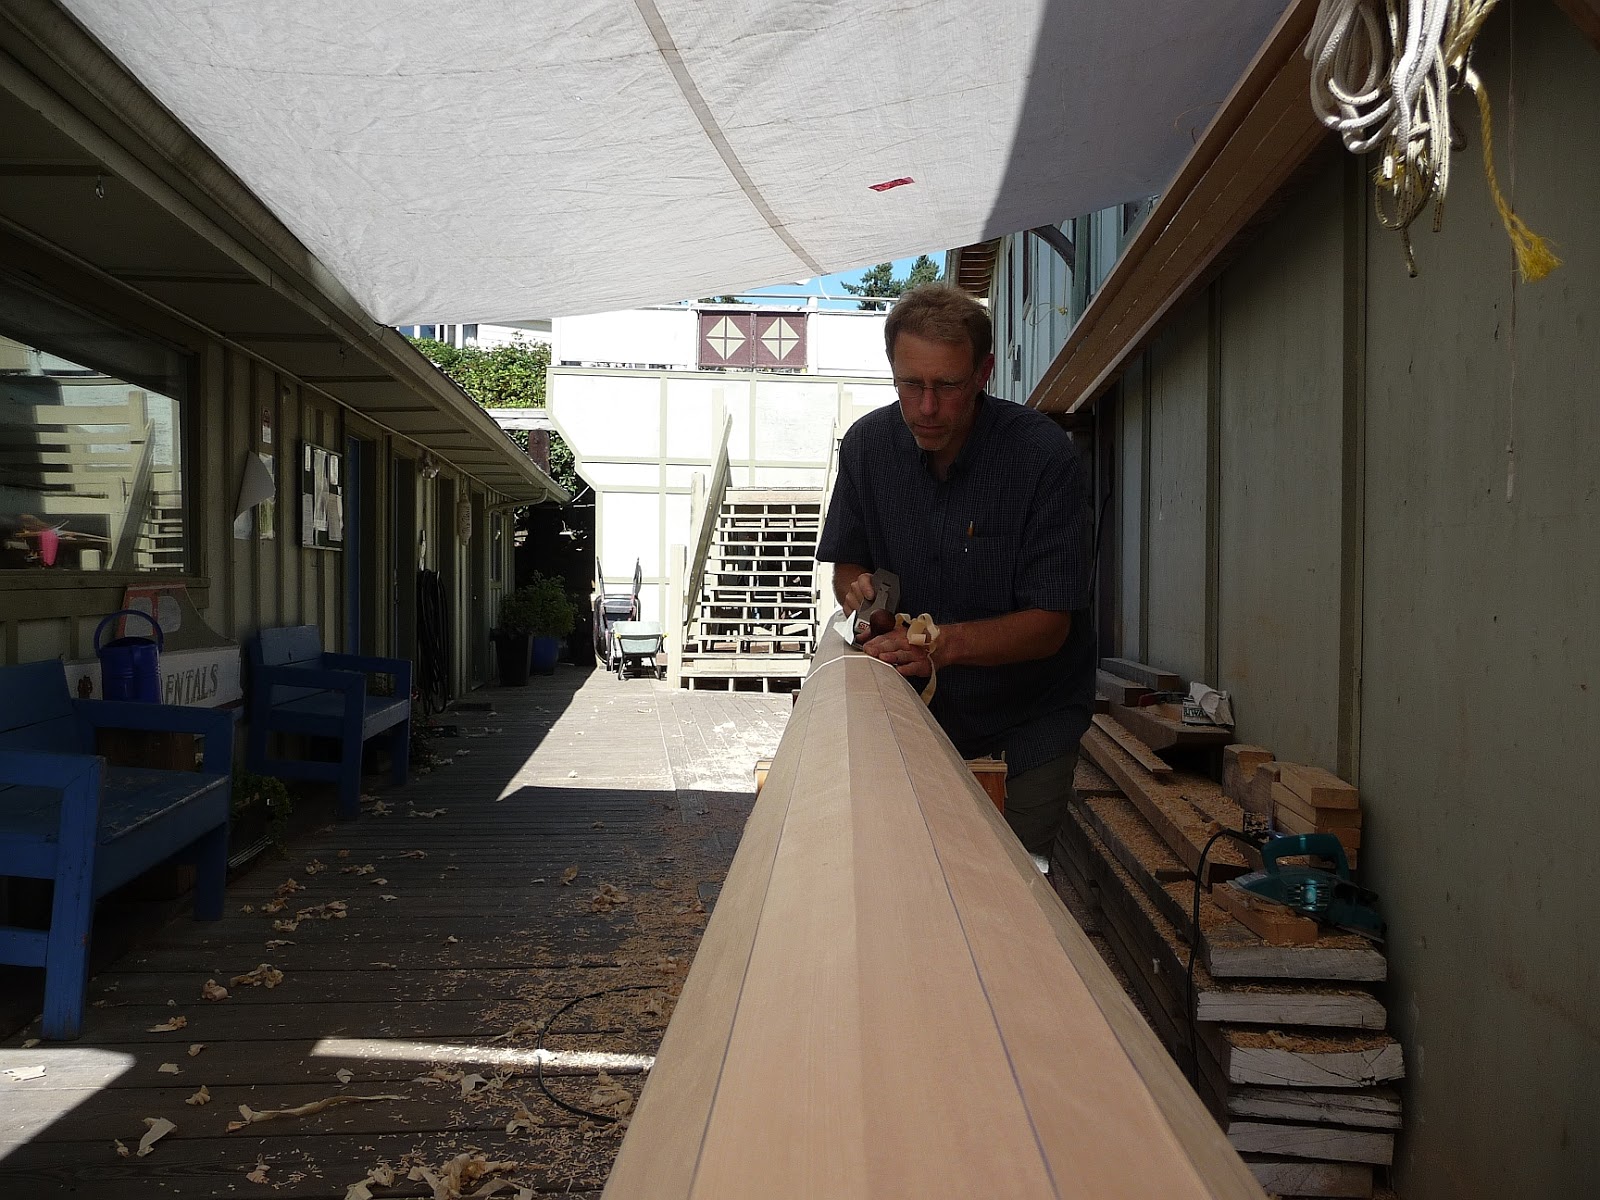
 Final rounding with the handplane. Next is to sand which Jean did the next day with a belt and drum attachment on the feather edger.


Sanded and silver bali track riser glued on, mast head built up and shaped and winch blocks glued on. First coat of varnish will be Epifanis varnish thinned over 50% with turpentine. Thanks to Jean and Robert  for helping me get this job done. It really feel great to see the spar built and my next big job is to start making all the bronze hardware which I will do over the winter. Hoping to rig in the spring.


Spars Part II

Next came the boom and I also needed to make a boat hook and oars for the dinghy.


The boom is solid for the weight and glued up in two halves of Sitka Spruce. No scarfs required, I had a length of Sitka long enough to make the 19ft boom


Making the round tapered boom is pretty straightforward. 


The boat hook tapered and  eight sided 


  The oars eight sided and ready for final shaping


Finished oars and boat hook

Spars Part I

It was a long winters work after launching the boat and my list of jobs on Astrid for the summer was long. Top priority was to get the spars built and to warm up I started with the bowsprit and boom. After a very long rainy winter we have had a great summer so the weather really co-operated with outside spar work.

The wood for the bowsprit is Douglas fir I have seasoned for about 10 years. I had spent a couple of days watching fir getting milled up before finding this piece of rift sawn tight grained clear fir. I was very careful air drying it and there was no cracks.


Tapered and eight sided with the cranze iron fitted.


 Shaping complete. The sections that have a brownish finish will be painted. The sealer I applied is varnish with turpentine with a splash of creosote


Dodger

Finally got to making the pram dodger this sumer. It took longer to sew than I anticipated with lots of fitting trails. All in all pleased with the outcome and really happy to see a bronze frame and not stainless. 


The attachment is with #10 round head bronze machine screws through a brass grommet in the canvas and into the cast diamonds that have a threaded hole. I posted those casting photos earlier. The result is a clean and unobtrusive attachment that will not break.


The dodger is tensioned with the  3/16" cord and to fold the dodger down and out of the way it is simply to undo those tension lashings.

Buhk Motor Installation

I thought I ought to post some photos of the 36hp Buhk  motor installation. To access I just lift off the companionway ladders and lift the engine box lid which folds back and hooks in place. The front and side drop boards lift away to give great access to the motor. It only takes a minute or two.


The equipment area is under the cockpit which is open to the port quarter storage area. Easy access and still lots of space for organized storage. On the bulkhead is mounted the exhaust, Racor fuel water separator and reservoir for the drip-less shaft seal. A 4in vent provides air to the bilge. A few computer fans keep air flowing and draw nothing and are quiet.


The electrical distribution panel and solar controller and Blue Seas Batter charger / ACR mounted on the forward bulkhead under the cockpit. Everything easy to see.


I did not like the looks of the plastic control panel that came with the motor. Buhk also wanted $1500 for their gauge panel so I made my own with the components from the stock panel and VDO gauges. I mounted it on the side of the engine box as you come down the companionway. Out of sight, out of the weather and certainly quick enough to start the motor when you need it.


Sunday, February 19, 2017

Keeping warm in a cold winter


It has been quite a lousy winter here. Rain, snow, sleet and a damp bitter cold. That's the coast for you but I will take dry sunny -20C any day over this. So getting the heater finally running was on the top of the to-do list. I had the 5Gallon/20L aluminum tank made by Straight Metal and installed it on the bulkhead in the starboard lazarette locker. The kerosene is gravity fed to the heater. There is an inline filter below the shut off valve. 


The fill for the kerosene is in the lazarette propane locker. Made a small bronze L bracket for the fill.


The heater on it's first run. Have it pretty dialed in now and can run it on a low even blue flame. Pre-heat with alcohol and introduce the kerosene shortly after lighting. No fans or pumps, runs quiet and clean and warms up the boat really well. 


Managed to do a bit of sewing. Made the cockpit awning. Next jobs to finish are the dodger and dinghy. Time is tight right now with work but hopefully as spring gets here I can spend a bit of time getting to some of the unfinished jobs.