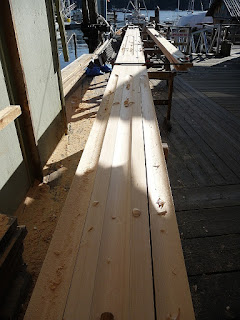
The first job was to plane it to thickness before transporting to Abernethy and Gaudin Boat Builders in Brentwood Bay here on the Saanich Peninsula. I decided in order to keep within my time frame and due to the scale of the job and length of the wood I would need a hand to get this last big job done on the boat. When I approached Jean Gaudin about working with him to build it he was just putting the final touched on a box section spar about 47ft long.
Abernethy and Gaudin Boat Builders work mainly with traditional boatwork in a real old time boat shop in Brentwood bay equipped with a marine railway. This summer they just finished a total rebuild of the English Pilot cutter Carlotta.
http://www.agboats.com/
This turned out to be a great way to get the job done. It was great to work with Jean and his experience meant the job went efficiently and accurately.
It would be a hollow round mast built of four staves like a box. The aft and forward stave would be full width. The spar is 53ft 2in long and 7 1/4" diameter.
Planning the mast wood before transporting it up to A&G. I had the space to pass the 40ft lengths through the planer
The first job was to lay out the boards and decide what boards would be used where. We just managed to get all four sides with only one scarf per side. Not bad for a 53ft spar ! Next we built and leveled up a spar bench.
Once the scarfs were cut with a circular saw, hand planed and glued we could cut the staves to width. Then we could layout for hollowing. Jean had a great technique using the circular saw and a small blade where he made passes at an angle to hollow. Just like you do on a table saw but here your passing the saw over the wood not the other way around. All we had to do was clean up with the hollowing plane and make the transitions with a gouge.
We built the mast with the aft stave down as that would be straight, the sides and fwd stave would be tapered. The aft stave basically became the spar bench once glued up.
Jean using the circular saw to cut the hollows. This saved a lot of time and work. Been hot and sunny but really nice to work outside.
The hollowing transitioned to square where the red cedar blocking goes at the spreaders. Here the sides are dry clamped to the aft stave for fitting blocking and checking the fit. The side staves were cut with the circular saw, one edge was trued up with a jointer plane and then we planed it to final width through the Makita portable planer taking multiple passes. We ended up with fair edges that only needed minor adjustments to get a perfect fit for gluing.
Gluing the two side staves to the aft stave. We used 115 clamps. We left the aft stave full width and sprung in the side staves to our marks for the taper. Once the glue had cured we trimmed off the excess of the aft stave sticking out.
Now we tapered and faired the side staves above the upper spreaders, added the conduit, ran wired for lights and tin foil for radar reflector. A test fit of the fwd stave and we were ready for sealing and gluing.
Glued up and square. It looks very heavy right now. The gluing went very well, nice glue joints everywhere. We used System Three G2 Epoxy.
Eight sided and starting to get lighter and look more like a mast. This is fun work.
Sixteen sided above the deck.
Knocking the corners off the 16 sides to 32
Final rounding with the handplane. Next is to sand which Jean did the next day with a belt and drum attachment on the feather edger.
Sanded and silver bali track riser glued on, mast head built up and shaped and winch blocks glued on. First coat of varnish will be Epifanis varnish thinned over 50% with turpentine. Thanks to Jean and Robert for helping me get this job done. It really feel great to see the spar built and my next big job is to start making all the bronze hardware which I will do over the winter. Hoping to rig in the spring.


