A few miscellaneous photos. During some of the painting last month I wanted to find a cream for the cabin roof. After trying two of the Interlux colours I went with the Epifanes Cream which had to be ordered from Toronto. I think it will do. Eventually the main cabin roof will be painted of course but should wait until everything is attached such as the stay'sl winches and fairleads. Grab rails and other structures are white.
Castings finished being ground and polished.
The 5 coats of varnish on the skylight coaming meant the light could get installed. Bulkhead hanging light from Davey. You can see the bases for the dinghy chocks being worked on as well. 1/2" pads that have a epoxy fillet raise the chock off the roof. The chocks are attached with three 5/16" machine screws which are tapped into epoxy plugs in the roof. That was there is no way water can infiltrate a screw hole and get to the cedar.
Fitting the 3/8" laminated safety glass and trim rings to the skylight here. 7 coats of varnish and counting...
Drop boards are laminated of 3/16" teak both sides over a 18mm marine ply core. I did this for a few reasons. For one getting teak thick enough for the drop board´s was difficult and very expensive. Re-sawing some teak I had stretched out my supply. Two, I had seen this construction on a Walsted built boat and after 40 some years the drop boards were in perfect shape. Three, they will be stable and not swell and shrink. I laminated as usual with Prefer (Aerodux 500) resorcinol glue.
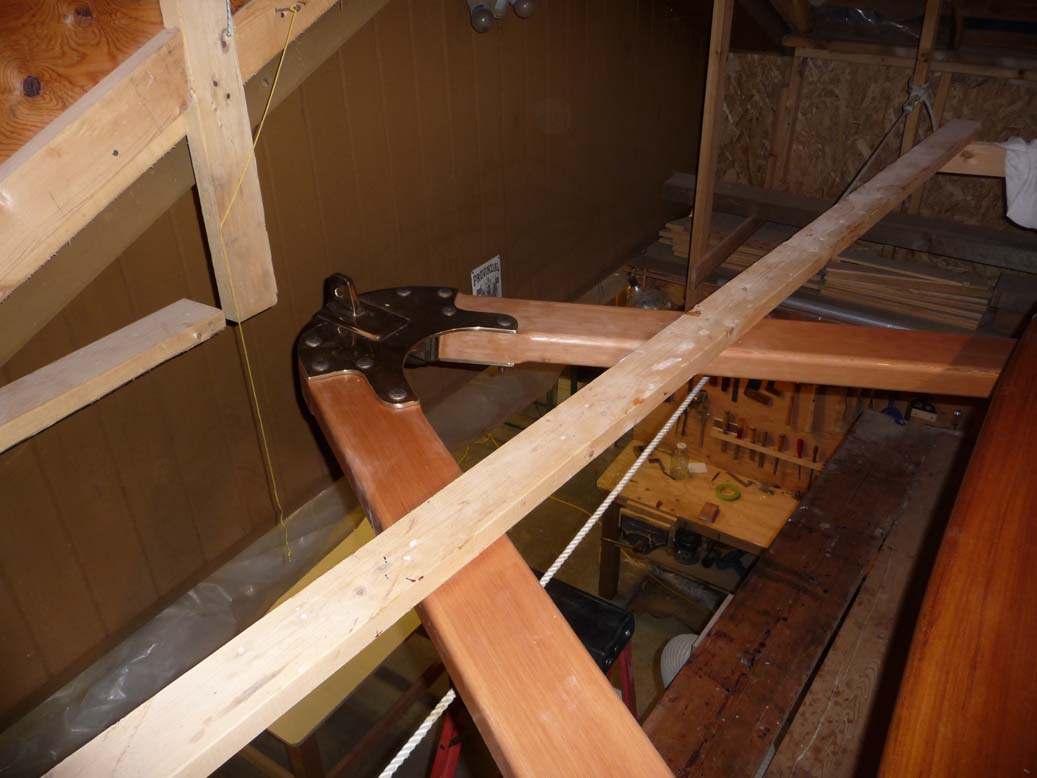
Boomkin and Boom gallows dry fitted here and ready for last disassemble before attaching permanently. Found some quarter sawn Douglas fir that had the grain at a 45 degree angle so it was edge grain all four sides. It was dense and heavy with no sap wood and extremely tight grain. It took a long time to find the perfect piece of wood for this job.
The boom gallows fittings are from Port Townsend Foundry and are very nice. I filed the holes for larger 3/8" carriage bolts as they are structural for the boomkin as well as acting as mooring line base. The boomkin is also attached through the deck and blocking with two 1/2" bronze carriage bolts at the aft end.
In order to fit the boomkin on a horizontal plane I had to glue two teak pads to the fir which were then shaped to fit the deck. The aft cut on the teak pads follow the rake of the transom. The teak pads also get the much less rot resistant fir off the deck. The boomkin will be paĆnted white. There are also two mushroom vents beside the lazarette hatch. I had wanted to have them tucked away a bit better but due to deck beams and blocking etc this was the only place they could go.
Monday, June 27, 2011
Sunday, May 15, 2011
Working on various things right now. Painting and varnishing which takes lots of time, grinding and polishing castings, milling, boomkin.
I am also looking for a P.E Luke model 5 propane galley stove. Decent condition and preferably a Pacific NW location so I could pick up in person. It's a long shot but thought I would put it up here just in case.
Friday, March 4, 2011
2010: Working on the Roof
OK, it's catch up time. I will admit first off that 2010 was a bit of a disaster as far as getting anything done on
the Falmouth Cutter was concerned. There was quite a bit taking me away but here is some of the work done.
I picked up where I left off on the roof and continued building the hatches. The first job was fitting the teak rails for the sliding hatch garage. They extend to the skylight so they form a storage area between them. The dorade boxes are extentions of the skylight so all of it hopefully looks like one unit. Like it was planned out or something like that.
When bedding down things such as these rails for the companionway pram dodger I always run some shallow saw kerfs along the bedding surface so there is a place for the polyurethane goop to key into. I did the same with the bulwarks and rubrail but of course I could not run those over the table saw so I used a scraping tool to make the grooves. The rails for the sliding hatch, garage and dodger all got bolted down through the centre of the roof beams with 1/4" bronze carriage bolts. By pre-drilling the holes in the rails on the drill press I had a guide to drill down through the roof and beam. A bit nerve wracking should I come out anything but dead centre of the beam but it worked out perfectly thankfully.

Dodger rails

Here is the sliding hatch garage which is solid fiberglass I laid up over a mold. I laid up ten layers of matt and roving which gave me 5/16" thickness. It is strengthened with the laminated teak beams.
The sliding hatch garage lid is secured with oval head bronze screws and is removable so I can get in the garage to clean it out and maintain it. The inside of of the dorade boxes, garage and inner side of the dodger rails all got fillets of epoxy to aid water drainage.
For interest here are two cut out's from the cabin roof and deck. The one on the right is for the two round Davey prism's that will go on either side of the cabin roof. Red and yellow cedar.One over the galley counter and one over the ice box/chart table.
The one on the left is for the forward dorade vent on the foredeck. Red cedar and Silver Bali. I like seeing how the laminations turned out and the picture shows the deck core from the fwd dorade vent on the left and the roof core on the right.
the Falmouth Cutter was concerned. There was quite a bit taking me away but here is some of the work done.
I picked up where I left off on the roof and continued building the hatches. The first job was fitting the teak rails for the sliding hatch garage. They extend to the skylight so they form a storage area between them. The dorade boxes are extentions of the skylight so all of it hopefully looks like one unit. Like it was planned out or something like that.When bedding down things such as these rails for the companionway pram dodger I always run some shallow saw kerfs along the bedding surface so there is a place for the polyurethane goop to key into. I did the same with the bulwarks and rubrail but of course I could not run those over the table saw so I used a scraping tool to make the grooves. The rails for the sliding hatch, garage and dodger all got bolted down through the centre of the roof beams with 1/4" bronze carriage bolts. By pre-drilling the holes in the rails on the drill press I had a guide to drill down through the roof and beam. A bit nerve wracking should I come out anything but dead centre of the beam but it worked out perfectly thankfully.

Dodger rails

Here is the sliding hatch garage which is solid fiberglass I laid up over a mold. I laid up ten layers of matt and roving which gave me 5/16" thickness. It is strengthened with the laminated teak beams.
The sliding hatch garage lid is secured with oval head bronze screws and is removable so I can get in the garage to clean it out and maintain it. The inside of of the dorade boxes, garage and inner side of the dodger rails all got fillets of epoxy to aid water drainage.
The mounting rings for the smoke head and prisms also got fillets of epoxy to aid water drainage. Some work with first a grinder and then a spokeshave to fit the leveling block for the deck iron. I was pleased with the fit and felt it was a shame to cover it with an epoxy fillet but it is all getting painted anyways!
Navigator Stove works deck iron and smoke head. Very nicely made. Looking forward to getting their new "Herring" heater. I think it will be a good "fit" with the boat.
Here you can see the inside of the sliding hatch garage. Before it got painted I put in a epoxy fillet all around the inside to ease the escape of water out the four scuppers should it somehow get in there. The bronze rails are 1/8" thick and retains tabs on the sliding hatch.


The lid for the sliding hatch garage was laminated up with polyester resin and matt/roving. Ended up being 5/16" thick. There was no flex once the laminated teak beams were screwed to it. Copying to a degree what had been built on schooner "MAGIC" I decided to attach the lid with exposed bronze oval head screws. That way I can easily take it off to clean or check what is happening in the garage. I would hate to not be able to get in there to maintain it. Makes up keep of the sliding hatch varnish easier as well.
Also went on was the Navigator Stove Works smoke head with a teak leveling block. Some fancy work with the grinder and spokeshave got that fitting really nice. A small fillet of epoxy will help with water flow when painted. Same treatment for the Davey round prisms on the roof. They shine over the galley and the ice box/chart table. I was'nt quite sure how they would look but in the end I decided their usefulness in letting in light justified installing them. These types of things tend to blend in once everything is finished.
Started the painting. Takes some time.
A few more casting for the hardware inventory. The winch bases from Port Townsend Foundry were finished and the Falmouth Cutter's name is finally public.
Got on to making some casting patterns and into the foundry. The boomkin anchor roller and backstay tang, dinghy chocks, skylight trim and samson post cap. For the boomkin anchor roller I pretty much used what I had seen on the Pardey's Taleisin as the basis for making this pattern. Dingy chock base which is a split pattern and core block, samson post cap, skylight trim ring and boomkin anchor roller and tangs. Back stay tang separates at partline
Its been hot by Victoria standards and sunny for many weeks. Pretty nice but gets a bit too hot up on the boat during the middle of the day. Evenings have been great for sanding, painting and varnishing. Made a plywood template for the boomkin and worked out the angles and placement for the boomkin shroud tangs. The stern anchor roller is integrated much like on Pardy's boat. Here is the work in progress:

Navigator Stove works deck iron and smoke head. Very nicely made. Looking forward to getting their new "Herring" heater. I think it will be a good "fit" with the boat.
The sliding hatch also has UHMW glides that run on the bronze rails. It makes it really easy to slide the hatch open and closed. Here you can see the glides screwed to the hatch. They are easy to replace should they wear. The hatch is getting painted on the underside. The sliding hatch was made of 4 (maybe it was 5, I can't remember) laminations of 4mm BS1088 marine ply. 3/8" teak was glued over top of the plywood. Ought to be strong enough.

The lid for the sliding hatch garage was laminated up with polyester resin and matt/roving. Ended up being 5/16" thick. There was no flex once the laminated teak beams were screwed to it. Copying to a degree what had been built on schooner "MAGIC" I decided to attach the lid with exposed bronze oval head screws. That way I can easily take it off to clean or check what is happening in the garage. I would hate to not be able to get in there to maintain it. Makes up keep of the sliding hatch varnish easier as well.
Also went on was the Navigator Stove Works smoke head with a teak leveling block. Some fancy work with the grinder and spokeshave got that fitting really nice. A small fillet of epoxy will help with water flow when painted. Same treatment for the Davey round prisms on the roof. They shine over the galley and the ice box/chart table. I was'nt quite sure how they would look but in the end I decided their usefulness in letting in light justified installing them. These types of things tend to blend in once everything is finished.
Started the painting. Takes some time.
A few more casting for the hardware inventory. The winch bases from Port Townsend Foundry were finished and the Falmouth Cutter's name is finally public.Got on to making some casting patterns and into the foundry. The boomkin anchor roller and backstay tang, dinghy chocks, skylight trim and samson post cap. For the boomkin anchor roller I pretty much used what I had seen on the Pardey's Taleisin as the basis for making this pattern. Dingy chock base which is a split pattern and core block, samson post cap, skylight trim ring and boomkin anchor roller and tangs. Back stay tang separates at partline

I have been thinking I would really like to use black locust for the tiller, rudder cheek plates and anything else suitable but finding it on the west coast is difficult. It is not sold commercially and could not find it through the usual contacts in Port Townsend. Luckily friends of my sister recently bought a building property which was heavily overgrown and there happened to be some locust trees some of which were coming down. I got Bryan from Channel Cutter Yachts involved figuring the process would be easier with two and we could hopefully get some good wood out of it. It is nice to get wood this way although it takes time.
For interest here are two cut out's from the cabin roof and deck. The one on the right is for the two round Davey prism's that will go on either side of the cabin roof. Red and yellow cedar.One over the galley counter and one over the ice box/chart table.
The one on the left is for the forward dorade vent on the foredeck. Red cedar and Silver Bali. I like seeing how the laminations turned out and the picture shows the deck core from the fwd dorade vent on the left and the roof core on the right.
Tuesday, December 15, 2009
Building a Lyle Hess 34' Falmouth Cutter
Got a start on the cabin roof during a month and a half this November-December. The roof was cold-molded of three layers of cedar and lots of fairing with the long board which is not my idea of fun. It was good to finally get the roof done and on to making the hatches. Here is a mass of general trimming and construction details from building the interior of the FC34. The bulkhead trim is handshaped into a pleasing mushroom profile.
Here is the curved corner for the starboard double bunk.
Tuesday, August 4, 2009
Building a Lyle Hess 34' Falmouth Cutter

UpDated July 27th I have decided to reformat the site as I find it more natural to view the photo's from the begining of the project to the present, like reading a book. I'll update a post at the begining with one or two current photo's and what is happening but otherwise scroll down through the project history to see the current progress. This June and July I finished the deck, bulwarks, cabin roof framing, milled the cedar for the roof and planked the teak transom and I will return to build the cabin roof and rudder in the fall. Feels like we're getting somewhere...
In recent news Bryan Gittens of Channel Cutter Yachts launched a new 34' FC in July.
Subscribe to:
Posts (Atom)